Table of Contents
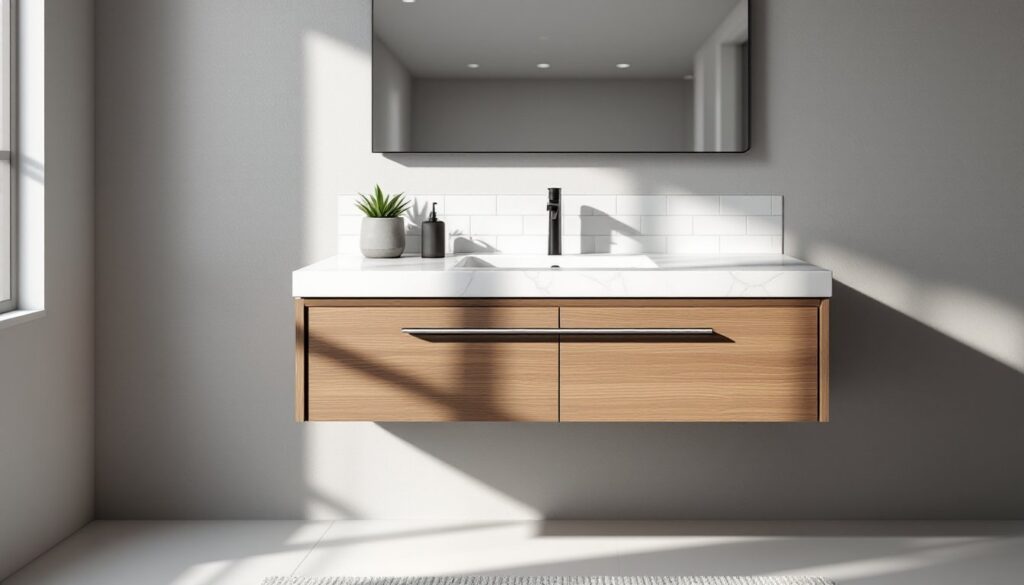
ToggleA floating vanity can redefine how a bathroom looks and functions. Mounted directly to the wall without legs or a base, it creates a sleek, airy feel while solving real-world problems like tight floor space and tricky cleaning angles. This isn’t just about aesthetics, though the modern look is undeniably appealing, it’s about making small bathrooms feel bigger, simplifying maintenance, and adding a touch of customization that standard cabinets can’t match. Whether renovating a powder room or tackling a full bath overhaul, a wall-mounted vanity offers flexibility in design and installation that homeowners and DIYers appreciate once they understand the mechanics behind it.
Key Takeaways
- A floating vanity bathroom design creates a sleek, airy aesthetic while solving practical problems like tight floor space and improving accessibility for maintenance and cleaning.
- Proper installation of a floating vanity requires securing mounting hardware into wall studs or a structural cleat system, as the combined weight of countertop, sink, and storage can exceed 150 pounds.
- Choose durable cabinet materials like plywood with moisture-resistant finishes (thermofoil or laminate) and hardware in solid brass or stainless steel to prevent deterioration in humid bathroom environments.
- Floating vanities accommodate customized countertop heights and integrate vessel sinks or wall-mounted faucets more easily than traditional floor-mounted units, offering greater design flexibility.
- Maximize storage in a wall-mounted vanity through drawer dividers, vertical shelving, medicine cabinets, and organizational accessories that keep the clean aesthetic intact without clutter.
What Is a Floating Vanity and Why Choose One?
A floating vanity is a bathroom cabinet that mounts to wall studs with no visible support touching the floor. The countertop, sink, and storage all hang suspended, leaving the floor beneath open and visible. This design contrasts sharply with traditional vanities that sit flat on the floor with toe kicks or decorative legs.
The appeal goes beyond looks. Floating vanities make small bathrooms feel more spacious by exposing more floor area, which tricks the eye into perceiving greater square footage. Cleaning becomes easier since mops and vacuums glide underneath without obstruction. Plumbing access improves, too, no need to wrestle with a bulky cabinet base when a shutoff valve needs attention or a P-trap starts leaking.
That said, installation requires solid blocking or wall reinforcement. A vanity loaded with a stone countertop, vessel sink, and toiletries can weigh 150+ pounds, so mounting hardware must anchor into wall studs or a structural cleat system, not just drywall. Anyone uncomfortable with stud finders, leveling, or lag screws should consider hiring a carpenter or handyman. Permits typically aren’t required for vanity installation unless plumbing relocations involve changes to drain lines or supply pipes that fall under local codes.
Design Benefits: Style Meets Functionality
Floating vanities deliver a contemporary, minimalist profile that pairs well with frameless mirrors, open shelving, and matte black fixtures. The clean lines and shadow gap between cabinet and floor create visual breathing room, which is especially valuable in bathrooms under 50 square feet.
Beyond aesthetics, wall-mounted vanities accommodate ADA-compliant installations more easily than floor-mounted units. Mounting height can be adjusted to suit wheelchair users or individuals who prefer a higher or lower countertop. Standard vanity height is 32 to 36 inches from the floor to the countertop, but a floating design allows customization within that range, or outside it, without requiring custom cabinetry.
Material choices amplify the design flexibility. A walnut veneer cabinet brings warmth to an otherwise stark white-tile bathroom, while a high-gloss lacquered finish in navy or charcoal adds drama without overwhelming the space. Countertop materials range from quartz and marble to solid-surface composites and even butcher block sealed with marine-grade polyurethane for moisture resistance. Homeowners exploring design ideas for modern bathrooms often gravitate toward floating vanities for their versatility in matching both industrial loft vibes and Scandinavian simplicity.
Another advantage: easier integration of vessel sinks or wall-mounted faucets. Since the cabinet doesn’t dictate faucet placement the way an undermount sink does, designers can position fixtures for optimal ergonomics or visual balance.
Choosing the Right Floating Vanity for Your Bathroom
Size and Configuration Options
Floating vanities come in widths from 24 inches (ideal for powder rooms) up to 72 inches or more for double-sink master baths. Depth typically ranges from 18 to 21 inches, though shallow models at 16 inches exist for extremely tight spaces. Measure the available wall space carefully, accounting for door swing clearance, toilet proximity, and any obstructions like light switches or heating vents.
For single-sink setups, a 36- to 48-inch vanity offers adequate countertop workspace and storage without dominating the room. Double-sink configurations require at least 60 inches of width to provide elbow room for two users simultaneously. When ordering online or from a big-box retailer, confirm whether the listed dimensions include the countertop overhang or just the cabinet box, some manufacturers measure differently.
Consider drawer versus door configurations. Soft-close drawers maximize usable storage and prevent slamming, but they add cost and require more precise installation to ensure alignment. Open shelving below the sink trades enclosed storage for visual lightness and easy access to towels or baskets, though it won’t hide clutter the way doors do.
Material and Finish Considerations
Cabinet construction matters in humid bathroom environments. Plywood carcasses with dovetailed drawer boxes outlast particleboard, which can swell and delaminate if exposed to moisture from shower steam or sink splashes. Solid wood doors look premium but require periodic refinishing in high-humidity climates: thermofoil or laminate surfaces resist moisture better and clean up easily with a damp cloth.
For countertops, quartz remains the most popular choice for floating vanities due to its durability, non-porous surface, and wide range of colors. Expect $50 to $120 per square foot installed, depending on the brand and edge profile. Solid-surface materials like Corian cost less, around $40 to $80 per square foot, and can be seamlessly integrated with undermount sinks for a continuous look. Marble and granite add luxury but require sealing every six to twelve months to prevent staining.
Finish durability is critical. Painted cabinets show wear faster than stained or naturally finished wood. If opting for paint, specify a catalyzed conversion varnish or waterborne polyurethane topcoat for moisture resistance. Matte finishes hide fingerprints better than high-gloss, but they can be harder to wipe clean.
Hardware, pulls, knobs, and hinges, should be solid brass or stainless steel rather than zinc alloy, which corrodes in damp conditions. Soft-close hinges add $2 to $5 per hinge but dramatically improve the user experience and cabinet longevity.
Installation Guide: How to Mount a Floating Vanity
Before starting, gather the necessary tools: a stud finder, 4-foot level, drill/driver with bits, lag screws (typically ¼ x 3-inch or ¼ x 4-inch), construction adhesive, a circular saw or miter saw for cutting blocking if needed, and a helper, floating vanities are awkward to hold level while fastening.
Step 1: Locate wall studs using a stud finder. Mark centerlines with a pencil. Standard stud spacing is 16 inches on center, but verify rather than assume. If studs don’t align with the vanity’s mounting brackets, install a horizontal cleat (a length of 2×6 or 2×8 lumber) spanning multiple studs to create a continuous mounting surface. Fasten the cleat with 3-inch wood screws into each stud.
Step 2: Determine mounting height. Measure from the floor to the desired top-of-countertop height (usually 32 to 36 inches), then subtract the countertop thickness and the cabinet height to find where the bottom of the cabinet should sit. Mark a level line across the wall using a 4-foot level and a straightedge.
Step 3: If not using a cleat, mark the locations where the vanity’s mounting rail or brackets will hit the studs. Pre-drill pilot holes in the studs to prevent splitting, using a bit slightly smaller than the lag screw diameter.
Step 4: Enlist a helper to hold the vanity in position against the wall, aligned with the level line. Double-check level in both directions, side to side and front to back. Once positioned, drive lag screws through the vanity’s mounting rail into the studs or cleat. Use at least two screws per stud for a secure hold. Some vanities include a French cleat (two interlocking beveled boards) that hooks onto a wall-mounted rail: this system distributes weight well and simplifies leveling.
Step 5: Connect plumbing. Floating vanities often require wall-mounted drain assemblies and supply lines that exit the wall rather than the floor. If transitioning from a floor-mounted vanity, a plumber may need to relocate shutoff valves and reroute drain tailpieces. Use braided stainless-steel supply lines for flexibility and longevity. Check for leaks by running water for several minutes before closing up any access panels.
Step 6: Attach the countertop if it shipped separately. Apply a bead of silicone adhesive along the top edge of the cabinet, set the countertop in place, and weigh it down overnight. Secure any undermount sinks according to manufacturer instructions, typically with clips and epoxy.
Safety Note: Wear safety goggles when drilling overhead and use a dust mask if cutting blocking lumber indoors. Keep the work area clear of trip hazards, especially when handling heavy countertop slabs.
Maximizing Storage in a Wall-Mounted Vanity
Floating vanities sacrifice some storage compared to floor-mounted models, but thoughtful organization compensates. Start with drawer dividers and adjustable shelves to customize interior space for toiletries, cleaning supplies, and towels. Stackable bins or baskets keep small items from becoming a jumbled mess.
Vertical space above and beside the vanity is fair game. Install a medicine cabinet with mirrored doors to store medications and grooming tools without cluttering the countertop. Open shelving or a narrow ladder-style rack can hold extra towels and decorative items. If wall space permits, a tall linen cabinet flanking the vanity adds significant storage without touching the floor, maintaining the floating aesthetic.
Inside the vanity, use the back of cabinet doors for hooks or adhesive organizers that hold hair tools, brushes, or washcloths. Pull-out trays or lazy Susans make corner cabinets more accessible. For inspiration on layout and storage solutions, many homeowners browse design galleries to see how others have tackled tight spaces.
Consider toe-kick drawers if the design allows, some floating vanities include a shallow drawer that tucks into the recessed space beneath the cabinet, perfect for flat items like bath mats or cleaning cloths. While not every model offers this feature, it’s worth asking when custom-ordering.
Finally, don’t overlook countertop real estate. A tiered tray or wall-mounted shelf above the sink keeps daily essentials within reach without taking up drawer space. Match storage accessories to the vanity’s finish for a cohesive look, and avoid overcrowding, part of a floating vanity’s appeal is the clean, uncluttered vibe it brings to the bathroom.