Table of Contents
ToggleA waterfall kitchen island isn’t just a countertop with legs, it’s a continuous slab of material that flows from the work surface down to the floor, creating a dramatic vertical edge. This design element has moved from high-end showrooms into real-world kitchens, and for good reason. It adds visual weight, hides storage awkwardly, and creates a focal point that doesn’t rely on cabinet hardware or paint colors. If you’re planning a kitchen remodel or considering a waterfall island kitchen upgrade, understanding the materials, costs, and installation realities will help you make a choice that fits both your space and your skill level.
Key Takeaways
- A waterfall kitchen island features continuous countertop material that flows vertically down the sides to the floor, creating a dramatic focal point that hides cabinetry and adds visual weight to modern kitchens.
- Waterfall kitchen island costs typically range from $2,500–$5,000 for fabrication and installation, plus additional material costs ($600–$720 for a standard 3-foot island), making it a significant but value-boosting investment for kitchen remodels.
- Quartz is the most forgiving material for waterfall islands due to its uniform dimensions and low maintenance, while marble offers high-end aesthetics but requires annual sealing and immediate cleanup of acidic spills.
- The miter joint where the horizontal and vertical surfaces meet requires precision cutting, book-matching, and epoxy bonding—poor miters are immediately visible and should only be handled by professional fabricators with CNC technology.
- Waterfall islands demand professional installation for safety and quality, as heavy slabs (200–400+ pounds), specialized cutting tools, and precise 45-degree angles exceed typical DIY capability and risk.
- Maintenance varies by material: quartz needs only soap and water, natural stone requires annual sealing, and butcher block demands regular oiling and immediate spill cleanup to preserve the waterfall’s appearance and resale value.
What Is a Waterfall Kitchen Island?
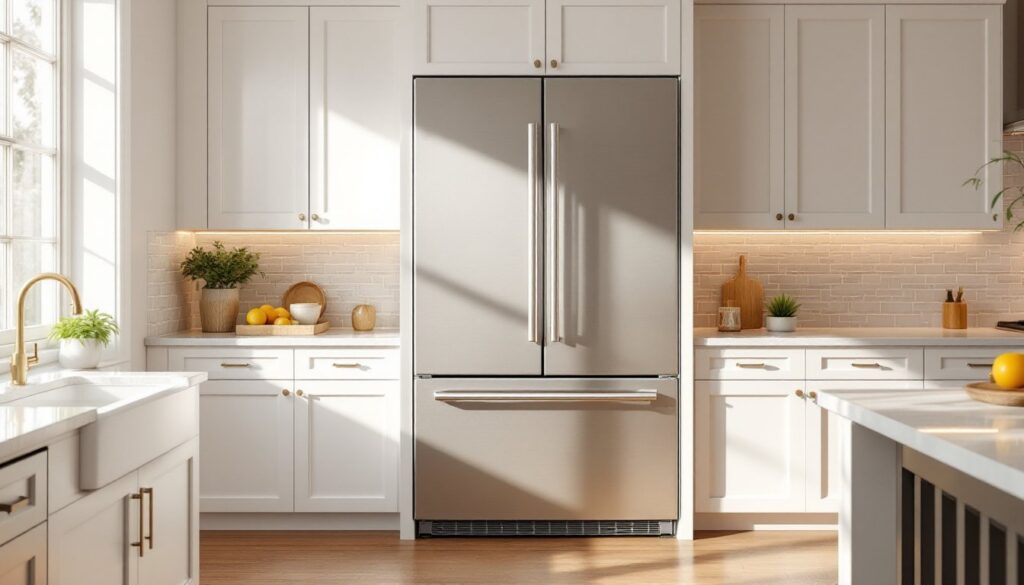
A waterfall island features countertop material, usually stone, quartz, or wood, that extends vertically down one or both sides of the island, meeting the floor at a 90-degree miter joint. Unlike standard islands where the countertop sits on cabinetry or legs, the waterfall edge creates an unbroken visual line from horizontal to vertical.
The most common configuration runs the material down one end of the island, often the seating side or a short end that faces the main kitchen work zone. Some designs run the waterfall down both ends for symmetry, though this doubles material costs and fabrication complexity.
Waterfall edges work on islands of any size. A small waterfall kitchen island in a compact kitchen can use a 3-foot-by-5-foot footprint with a single waterfall end, while larger layouts might feature 8-foot islands with waterfalls on both short ends or even wraparound designs that cascade down the back.
The miter joint where horizontal meets vertical is the defining technical detail. It requires precise cutting and book-matching, aligning the material’s grain or veining so the pattern flows naturally around the corner. Poor miters telegraph immediately and cheapen the entire look.
Why Waterfall Islands Are Taking Over Modern Kitchens
Waterfall islands solve both aesthetic and functional problems that standard islands don’t.
First, they hide the side profile of cabinetry. Standard islands expose cabinet ends, toe kicks, and hardware, details that need finishing and can look busy. The waterfall slab covers all of that, creating a clean monolithic form.
Second, they protect cabinet edges in high-traffic zones. If your island sits near a doorway or the main kitchen pathway, the vertical slab takes the bumps and scuffs instead of cabinet veneer or paint.
Third, waterfall edges add perceived value. Real estate agents and home stagers consistently note that waterfall islands photograph well and signal a recent, thoughtful renovation. Homes with waterfall islands often spend less time on the market in competitive neighborhoods.
From a design perspective, the waterfall provides a strong vertical line that grounds the island visually. Kitchens with contemporary design elements often use the waterfall to anchor other horizontal layers, floating shelves, long runs of upper cabinetry, or wide range hoods, by introducing a contrasting vertical gesture.
The practical downside? You lose some seating or storage flexibility on the waterfall side. Bar stools can’t tuck under as easily because the slab occupies the overhang space. Storage access also changes: you’ll need drawers or doors on the non-waterfall sides.
Design Styles and Material Options
Waterfall islands adapt to multiple design styles depending on material choice and finish.
Modern and minimalist kitchens favor solid-color quartz or honed marble with minimal veining. White, grey, and black slabs dominate, with matte finishes that reduce glare and fingerprints. The lack of grain or bold pattern keeps the focus on the form itself.
Transitional and contemporary spaces often use book-matched quartzite or marble with dramatic veining, think Calacatta or Statuario patterns. The veining should wrap the miter joint seamlessly, creating a continuous flow that highlights the craftsmanship.
Warm modern and Scandinavian-inspired designs lean toward wide-plank butcher block or live-edge wood waterfalls. Walnut, white oak, and maple are common. Wood waterfalls require more maintenance (annual oiling, vigilance about water exposure) but add warmth that stone can’t match.
Industrial and urban loft kitchens sometimes use concrete or ultra-compact surfaces like Dekton or Neolith. These materials handle the thin-profile miters well and resist scratching better than natural stone.
Popular Materials for Waterfall Edges
Quartz (engineered stone): Non-porous, consistent color and pattern, minimal maintenance. Slabs typically come in 3 cm thickness (about 1.2 inches). Quartz is the most forgiving material for waterfall installations because it’s manufactured to uniform dimensions and doesn’t require sealing. Expect $60–$120 per square foot installed, depending on brand and finish.
Granite: Natural variation, durable, heat-resistant. Requires annual sealing. Book-matching is harder due to natural inconsistency between slabs. Pricing ranges from $50–$100 per square foot installed. Granite waterfalls work best when you can source sequential slabs from the same block.
Marble: High-end aesthetic, softer than granite, prone to etching from acidic spills (lemon juice, vinegar, wine). Use honed finishes rather than polished to hide scratches. Marble runs $75–$200+ per square foot installed. Calacatta and Statuario marbles often exceed $150 per square foot due to rarity.
Butcher block: Warmth and texture, requires regular oiling and immediate cleanup of spills. Standard thickness is 1.5 inches. Miter joints in wood need skilled carpentry to avoid gaps as the wood expands and contracts seasonally. Material cost is lower, $30–$70 per square foot, but labor costs increase due to joinery complexity.
Porcelain slabs: Thin (as little as 6 mm or about 0.25 inches), lightweight, UV-stable, and scratch-resistant. Porcelain allows for large-format slabs with minimal seams. Installation requires specialized cutting tools and adhesives. Pricing sits around $50–$100 per square foot installed.
Material choice impacts fabrication difficulty. Harder materials like quartzite demand diamond blades and water-cooled saws. Softer materials like marble cut easier but chip more readily at miter edges.
Cost Considerations: What to Budget For
Waterfall islands cost significantly more than standard countertops due to material volume and fabrication complexity.
Material costs increase because you’re covering vertical surfaces, typically 30 to 36 inches of height per waterfall end. A standard 3-foot-wide island with one waterfall uses about 7.5 to 9 square feet of additional material for the vertical section. At $80 per square foot, that’s $600–$720 in extra material alone.
Fabrication and installation labor adds another premium. The miter joint requires CNC cutting or precise hand-cutting to achieve tight seams, then epoxy bonding and clamping. Many fabricators charge a $300–$600 surcharge per miter joint on top of standard installation fees. Total fabrication and install for a mid-range quartz waterfall island typically runs $2,500–$5,000, depending on island size and local labor rates.
Support structure matters. The vertical slab can’t hang unsupported, it needs blocking or a steel frame inside the island cabinet. If your existing island isn’t built to accommodate this, you’ll need carpentry work to add 2×4 blocking or a welded steel frame. Budget $200–$500 for structural modifications.
Delivery and handling also escalate. Large slabs are fragile and heavy (3 cm quartz weighs about 18–20 pounds per square foot). Expect delivery fees of $150–$300 and potential crane or lift-gate charges if access is difficult.
Permitting usually isn’t required for countertop replacement unless you’re altering load-bearing structure or plumbing. Check local codes if you’re adding an island in a new location, electrical outlets on islands often need GFCI protection per NEC Article 210.8.
To save costs without sacrificing the look, consider a single waterfall end instead of two, or use a thinner slab (2 cm instead of 3 cm) if your fabricator supports it. Some homeowners also opt for a waterfall on one end and standard cabinetry solutions on the other sides to balance budget and function.
Installation Tips and Professional vs. DIY
This is not a beginner DIY project. Waterfall island installation demands precision cutting, heavy lifting (slabs weigh 200–400+ pounds), and specialized tools. Most homeowners should hire a professional fabricator who templates, cuts, and installs as a package.
That said, if you’re an experienced DIYer with access to the right equipment, here’s what the process involves:
-
Template the island. Use a laser level and rigid template material (MDF or hardboard) to create exact patterns of the horizontal and vertical surfaces. Account for any overhang on seating sides, typically 12 to 15 inches for bar stools.
-
Cut the slabs. You’ll need a wet tile saw with a diamond blade rated for the material, ideally a bridge saw for straight cuts and a CNC router for miter bevels. The miter cut must be dead-on 45 degrees (or whatever angle your design requires). Even a half-degree off creates visible gaps.
-
Dry-fit the pieces. Before applying adhesive, set the horizontal and vertical slabs in place to verify the miter joint closes tightly. Use shims and clamps to hold alignment. This step reveals problems while you can still adjust.
-
Bond the miter joint. Use two-part epoxy color-matched to the slab. Apply evenly, clamp the joint, and allow full cure time (usually 24 hours). Any squeeze-out needs immediate cleanup with acetone before it hardens.
-
Secure the vertical slab. Anchor the waterfall to the island structure using construction adhesive and mechanical fasteners hidden inside the cabinet. The slab shouldn’t rely solely on the miter joint for support.
-
Seal and finish. For natural stone, apply penetrating sealer after installation. For wood, sand the miter joint smooth and apply food-safe finish or oil.
Tools required:
- Bridge saw or wet tile saw (rental: $100–$150 per day)
- Diamond blades for your material type ($50–$200 each)
- Laser level ($50–$300)
- Heavy-duty clamps ($30–$80 each: you’ll need at least four)
- Two-part epoxy and color-matching kit ($40–$80)
- Seam setters or suction cups for lifting ($100–$300)
Safety gear: Cut-resistant gloves, safety glasses, hearing protection, and dust masks rated for silica dust (if cutting stone). Silica dust is a serious respiratory hazard, wet cutting reduces airborne particles but doesn’t eliminate them.
When to call a pro: If your island includes plumbing (sink or dishwasher), electrical (outlets or charging stations), or if the slab weighs more than you and a helper can safely maneuver, hire it out. Most fabricators carry liability insurance that covers damage during install, your homeowner’s policy may not cover a dropped slab.
Another consideration: many professional design resources recommend hiring fabricators who provide digital templating and CNC cutting. The technology reduces human error and produces tighter joints than hand tools.
Maintaining Your Waterfall Kitchen Island
Maintenance depends entirely on material choice.
Quartz: Wipe with mild soap and water. Avoid abrasive pads, which can dull the finish. Quartz doesn’t need sealing. For stubborn stains, use a non-abrasive cleaner like Bar Keeper’s Friend.
Granite and marble: Seal annually with a penetrating sealer (test in an inconspicuous spot first). Clean up acidic spills immediately to prevent etching on marble. Use pH-neutral cleaners, dish soap works fine. Avoid vinegar, bleach, or ammonia-based products.
Butcher block: Apply food-safe mineral oil every 4–6 weeks, more often in dry climates. Sand out deep scratches or stains with 120-grit sandpaper, then re-oil. Never let water pool on wood surfaces: wipe up spills within minutes.
Porcelain: Extremely low-maintenance. Wipe with any household cleaner. Porcelain resists stains, heat, and scratches better than natural stone.
Miter joint care: Inspect the seam every few months. If you notice the joint opening (seasonal expansion in wood, settling in stone), contact your fabricator. Small gaps can be filled with color-matched epoxy, but widening gaps suggest a structural issue.
Chip repair: Stone chips at edges, especially around the miter. Keep a small tube of color-matched epoxy on hand for touch-ups. Clean the chip, apply a tiny amount of epoxy, let cure, then buff smooth with fine-grit sandpaper (400–600 grit).
Avoid placing extremely hot pans directly on any surface, even heat-resistant materials can suffer thermal shock if exposed to sudden temperature changes repeatedly. Use trivets or silicone mats.
For wood waterfalls, consider applying a water-based polyurethane topcoat for higher durability in heavy-use kitchens, though this changes the look and feel compared to an oiled finish. If you go this route, reapply every 2–3 years as the finish wears.
Waterfall islands are a long-term investment. Proper maintenance preserves both the appearance and the resale value of the feature, keeping that miter joint crisp and the material looking fresh for years.