Table of Contents
ToggleA pool of standing water in the bottom of a GE dishwasher after a cycle is frustrating, and messy. When a dishwasher won’t drain completely, dishes stay wet, the unit smells stale, and the problem often worsens if ignored. The good news? Most drainage issues stem from simple clogs or minor mechanical failures that don’t require calling a technician. With basic tools and some systematic troubleshooting, homeowners can often restore proper drainage in under an hour. This guide walks through the seven most common causes of a GE dishwasher (including GE Profile models) not draining and provides clear, step-by-step fixes.
Key Takeaways
- A GE dishwasher not draining is usually caused by a clogged filter, kinked drain hose, or garbage disposal knockout plug still in place—issues that most homeowners can fix in under an hour without professional help.
- Clean the dishwasher filter every 2–4 weeks and inspect the drain hose for kinks or blockages, as these are the two most common culprits behind poor drainage.
- If the drain pump hums but water doesn’t move, or there’s no sound during the drain cycle, the pump motor may have failed and require replacement at a cost of $40–$100.
- A hard reset by holding the Start/Reset button for 3–5 seconds can resolve temporary control board glitches that prevent the drain cycle from running properly.
- Always disconnect power at the breaker before inspecting or repairing drainage components, and maintain a high loop in the drain hose to prevent backflow from the sink.
Why Your GE Dishwasher Won’t Drain Properly
Dishwashers rely on a straightforward drainage system: dirty water exits through a drain pump, travels through a drain hose, and empties into either the garbage disposal or a dedicated sink drain line. When any component in this path becomes blocked or fails mechanically, water backs up.
Common culprits include:
- Clogged filter or drain basket (food debris, glass shards, or small objects)
- Kinked or obstructed drain hose (improper installation or settled debris)
- Garbage disposal knockout plug not removed during initial hookup
- Failed drain pump (worn impeller or burned-out motor)
- Control board glitch (temporary software error)
Most drainage problems in GE and GE Profile dishwashers result from clogs rather than mechanical failure. Start with the simplest checks first, filters and hoses, before testing electrical components. Always disconnect power at the breaker before performing any work beyond removing the filter. Standing water can make floors slippery, so keep towels handy and wear waterproof gloves.
Check and Clean the Drain Hose
The drain hose runs from the dishwasher’s pump outlet to the sink drain or garbage disposal. Over time, grease, food particles, and mineral deposits can narrow the hose interior or create a complete blockage. A kink in the hose, often caused by the dishwasher being pushed too far back during installation, can also prevent proper drainage.
Step-by-step drain hose inspection:
- Turn off power at the breaker and shut off the water supply valve under the sink.
- Pull the dishwasher forward slightly (you may need to remove the lower access panel and unscrew mounting brackets).
- Locate the ribbed rubber or plastic drain hose attached to the pump outlet at the base of the unit.
- Check for visible kinks, sharp bends, or compression. Straighten as needed.
- Disconnect the hose from the disposal or drain line (have a bucket and towels ready, residual water will spill).
- Disconnect the hose from the dishwasher pump outlet.
- Use a flashlight to inspect both ends. If clogged, use a long bottle brush or run water through from a utility sink to flush debris.
- Reconnect the hose, ensuring the high loop (the section that arcs above the drain connection point) is maintained to prevent backflow. Some jurisdictions require an air gap device instead, check local plumbing codes.
If the hose is cracked, brittle, or heavily clogged beyond cleaning, replacing a standard drain hose costs $10–$20 and takes about 15 minutes. Many drainage issues can be resolved by addressing the hose configuration alone.
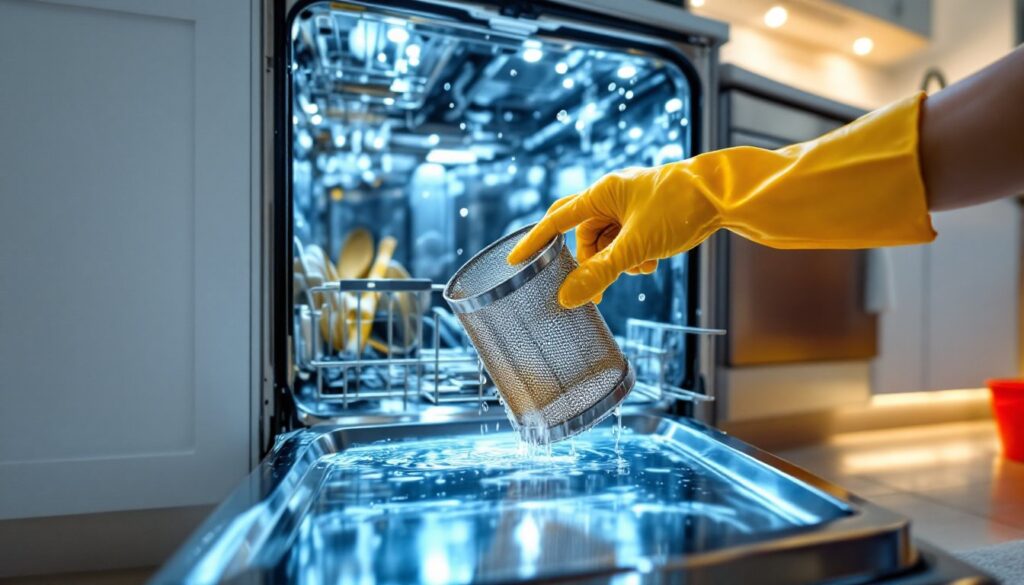
Clear the Dishwasher Filter and Drain Basket
The filter assembly in GE dishwashers captures food particles and prevents them from recirculating onto clean dishes. When the filter becomes clogged with grease, seeds, bones, or broken glass, water can’t reach the drain pump efficiently. This is the single most common reason dishwashers won’t drain.
How to clean the filter and drain basket:
- Remove the lower dish rack to access the floor of the tub.
- Locate the cylindrical filter assembly in the center or corner of the tub floor. Most GE models use a twist-and-lift design.
- Twist counterclockwise (typically a quarter turn) and lift the filter straight out. Some models have a two-piece assembly, a fine mesh filter inside a coarser outer filter.
- Inspect the drain basket (the housing beneath the filter). Remove any visible debris, including small objects like toothpicks, twist ties, or popcorn kernels.
- Rinse the filter under hot running water. Use a soft-bristle brush (an old toothbrush works well) to scrub away grease and buildup. Avoid abrasive pads that can damage the mesh.
- For stubborn residue, soak the filter in warm water with a few drops of dish soap for 10–15 minutes.
- Reinstall the filter by aligning the tabs and twisting clockwise until it locks into place. An improperly seated filter can cause poor drainage or grinding noises.
Maintenance tip: Clean the filter every 2–4 weeks depending on use. Scraping plates before loading (rather than rinsing) reduces filter clogging, but large food chunks should always be removed. Many homeowners assume pre-rinsing is necessary, but modern dishwashers, including GE models, are designed to handle moderate soil.
Inspect the Garbage Disposal Connection
If the dishwasher drains into a garbage disposal, a common installation mistake can cause a complete blockage: the knockout plug inside the disposal’s dishwasher inlet port must be removed before connecting the drain hose. If the plug remains in place, water has nowhere to go.
How to check and fix the knockout plug:
- Turn off power to the disposal at the breaker (never rely on the wall switch alone).
- Disconnect the dishwasher drain hose from the disposal inlet (usually a ribbed plastic nipple on the side of the unit).
- Use a flashlight to peer into the inlet port. If you see a solid plastic disc, the knockout plug is still present.
- Remove the plug by inserting a flat-head screwdriver into the port from the inside of the disposal (you may need to remove the disposal’s drain elbow to access it more easily).
- Tap the screwdriver with a hammer to punch out the plug. Important: Retrieve the plug from inside the disposal chamber, don’t let it fall down the drain line.
- Reattach the drain hose securely with a hose clamp to prevent leaks.
Even if the knockout plug was removed during installation, disposal clogs can block drainage. Run the disposal for 15–20 seconds with cold water to clear any trapped debris. If water backs up into the dishwasher during disposal use, the drain line between the disposal and the main stack may be partially clogged, this typically requires snaking the line or calling a plumber. Understanding common disposal-related issues helps diagnose whether the blockage is local to the dishwasher or deeper in the plumbing.
Test the Drain Pump for Failure
If the filter is clean, the hose is clear, and the disposal connection is open, the drain pump itself may have failed. The pump uses an impeller (a small spinning blade) and a motor to force water through the drain hose. Over time, debris can jam the impeller, or the motor can burn out.
Symptoms of a bad drain pump:
- Dishwasher hums or buzzes during the drain cycle but water doesn’t move
- No sound at all during the drain cycle (indicates motor failure)
- Intermittent drainage (pump works sometimes, fails other times)
How to test and inspect the drain pump:
- Disconnect power at the breaker.
- Remove the lower access panel (usually two screws at the bottom front of the unit).
- Locate the drain pump (a cylindrical or square component with hoses attached). Consult the model-specific service manual or an online diagram, GE dishwasher layouts vary.
- Inspect the pump housing for visible cracks or leaks.
- Disconnect the pump’s electrical connector and use a multimeter set to ohms (Ω) to test for continuity across the pump motor terminals. A reading of 0 or infinite resistance indicates a failed motor. Expected resistance is typically 50–200 ohms, check the service manual for your specific model.
- If the motor tests OK, manually inspect the impeller. Some pumps have a removable cover: others require full pump removal. Spin the impeller by hand, it should turn freely without grinding or excessive resistance. Remove any debris wrapped around the impeller shaft.
Replacement: Drain pumps for GE dishwashers cost $40–$100 depending on the model. Replacement is straightforward but requires disconnecting hoses and electrical connections. If you’re uncomfortable working with electrical components or the pump is difficult to access, hiring an appliance technician costs $150–$250 including the part. Testing electrical components safely requires proper tools and caution around water.
Reset Your GE Dishwasher
Modern GE dishwashers, especially GE Profile models, use electronic control boards that can occasionally glitch. A software error may prevent the drain cycle from initiating even when all mechanical components are functioning. A hard reset often resolves these temporary issues.
How to reset a GE dishwasher:
- Press and hold the Start/Reset button for 3–5 seconds. Some models require pressing it twice in quick succession.
- Wait for the dishwasher to drain (if the reset triggers a drain cycle, you’ll hear the pump run for 1–2 minutes).
- If that doesn’t work, perform a full power reset: turn off the breaker supplying the dishwasher for 5 minutes, then restore power. This clears the control board’s memory.
- Run a rinse cycle to test drainage.
Diagnostic mode: Many GE dishwashers have a built-in diagnostic mode accessed by pressing a specific button sequence (varies by model, common sequences include pressing Heated Dry four times in quick succession). The control panel will display error codes that can pinpoint drainage issues, such as a drain pump fault or stuck float switch.
If a reset temporarily fixes the problem but drainage issues return, the control board itself may be failing. Replacement control boards cost $100–$300 and typically require professional installation unless you’re comfortable with appliance electronics. Note that control board problems are less common than mechanical clogs, so exhaust all other troubleshooting steps first.
Conclusion
Most GE dishwasher drainage problems, including GE Profile dishwasher not draining issues, come down to clogs in the filter, hose, or disposal connection. These are DIY-friendly fixes that require only basic hand tools and a little patience. Start with the filter and work outward through the drainage path. If mechanical parts like the pump have failed, weigh the cost of replacement against the age and overall condition of the unit. Regular filter cleaning and mindful loading (scraping plates, keeping small objects out) prevent most drainage headaches before they start.